Configuring a Gap Finder Module
In this article, you'll learn how to configure a Gap Finder module.
For more information on when to use a Gap Finder vs. Dynamic Learning and other Gap Finder options, check out:
You can design your Gap Finder so that each learner is presented with a different variation…super valuable in a virtual setting where proctoring an exam is a real challenge.
Easy adjustments let you customize the test experience to your goals and situation. You can adjust:
There are also additional configuration options that must be done by your Amplifire Administrator. These include:
- Disabling the Gap Finder navigation panel
- Enabling dynamic modules
For more information on the configuration options available for Gap Finders, check out Gap Finder with Dynamic Modules and contact your Client Solutions Manager.
Timing
You can adjust the timing in various ways:
- The number of times learners can complete the Gap Finder
- For example, you can have the Gap Finder available to be taken multiple times by individuals (to gauge improvement) or completed just once.
- Whether you will limit the amount of time they will be allowed
- Whether learners are able to increase the time they are allowed

Question Count
“Pooling” is a powerful advanced option for presenting a specific number of questions from each topic your Gap Finder needs to cover.

Advanced Configuration
Once you've typed in the desired number of questions for learners to see, then select Advanced Configuration. A list of topics that are on each question will show up, and you can start designating how many questions from each topic to include. This way, the Gap Finder keeps the content proportionality intact.
Note: The number of questions you select must match the number listed above, and the number of questions you choose to include cannot exceed the number available.
Custom Messages
Amplifire has two different score-related message options:
Recommended Modules
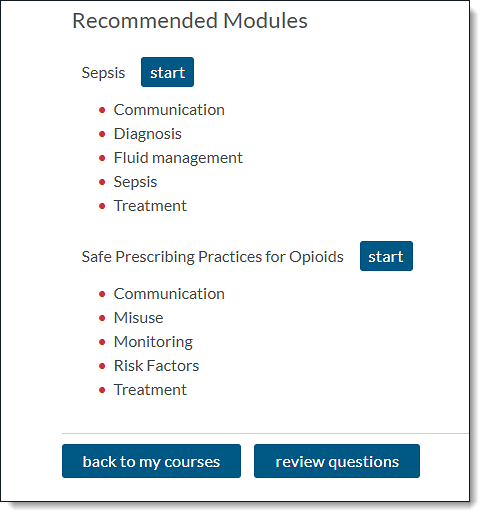
Recommended modules are dynamic learning modules you can add to your course that Amplifire can automatically recommend for learners to take based on their performance on the Gap Finder. In the Gap Finder configuration, it's a simple check box that enables the algorithm that will make the recommendations.
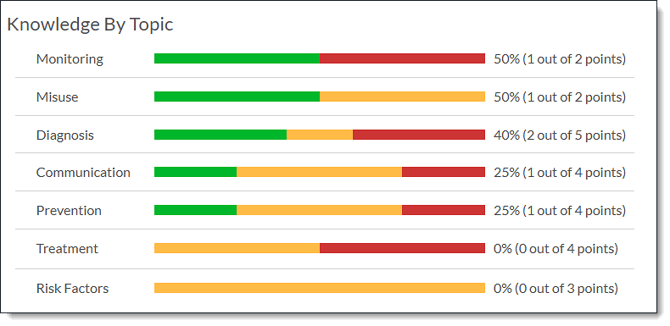
In Learning, once the user has completed the Gap Finder, they will see:
- A bar graph that shows their knowledge by topic

- A list of modules Amplifire recommends the user complete based on the topics they struggled with.

Overall-Score Messages
In addition to the recommended modules Amplifire can recommend for learners to complete based on their performance with specific topics, you can create custom overall score messages that provide more targeted information for learners.
These messages can say anything you want and can include images, videos, and links to documents that may be helpful for learners.

Note: Remember to assign scores starting with the smaller number first. Also, scores cannot overlap.
Topic-Based Messages
In addition to adding messages for learners based on their scores, you can also provide custom messages based on the topics learners struggle with. Just like the score-based messages, you can include text, images, videos, and links.

Note: Gap Finder can only use the first topic in a question. Topics are listed alphabetically. If you have a question with more than one topic and you don't want to use the first topic, you will either need to remove one of the topics or revise the topic you'd like the Gap Finder to use with either letters or numbers to move it to the front of the list.
Module Introduction Page
You can create a custom introduction for your Gap Finder module, just like with a dynamic module. The intro can include any instructions you'd like learners to see before they begin.
For more information about the module introduction, check out Introducing Your Course.