Using the Course List Icons
In this article, you'll learn how to use the Course List icons, including:
- Navigating the Course List icons
- Icon Functionality
For more information on creating courses, check out:
When you first log into Amplifire, you will go directly to your Course List, where you can navigate to a number of places. The Course List can be organized as a list or cards.
![]()
From the Course List, you can perform several operations:
- Create a New Course
- Create and Populate Folders
- Select Courses for Bulk Changes
- Search for Courses
- Filter and Sort Results
- Three Dot Menu
Create a New Course
![]()
There are three ways to create a new course in Amplifire:
Create and Populate Folders
Amplifire allows you to organize your content into folders. From the folders tab on the Course List, you can create a new folder, sort the order of your folders, and view any folders created in your account. Note: Folders are a tool for organization only. The courses do not move into folders, they just display there.
Each folder tile—if your account has any active folders—will allow you to:
- Use the three-dot menu to delete, duplicate, or add courses to the folder
- Use the View to see what’s inside the folder
For more information on how to use folders, check out Organizing Your Courses.
Select Courses for Bulk Changes
By clicking Select, you can select the course you want to work with. From there, you can
- Add the selected courses to an existing folder
- Create a new folder and add the selected courses to it
- Delete selected courses
Note: Once you click Delete, the selected courses will be deleted immediately. Please ensure that you have chosen only the courses you want to delete (and have the authority to do so).
Delete a Course
BEWARE! Accidental deletions can happen. This option is not available with courses that are published (phew!), but if you accidentally delete a course you're working on, it's gone forever. There is a double dare — "are you sure you want to delete this course?" — but it's still a permanent action. Click at your own risk.
Search for Courses
You can search for courses in your account by clicking on the blank search bar and typing part or all of the course title.
For the most successful search, try these strategies:
- Avoid searching for partial words, using a whole word or words, preferably the first word of the course.
- If you're searching for exact words, include quotation marks around them.
- If you have to search a partial word, include an asterisk at the end of the partial word.
![]()
Filter and Sort
Filter
Especially if your account includes a large number of courses, you may want to filter and/or sort them for easy location. You can filter in a number of different ways:
- Status. Publication status.
- Alerts. Notifications of unpublished edits and issues that must be resolved before publishing.
- Author. This is the author who created the course, not the one who made the most recent edits.

The handy number in the upper right corner indicates the number of filters applied, and it remains visible after you've clicked Apply.
![]()
Note: Your filter settings are surprisingly sticky, so if you return to your Course List after working in your course (or even logging out and back in), check the number of filters applied before you freak out that your courses are missing.
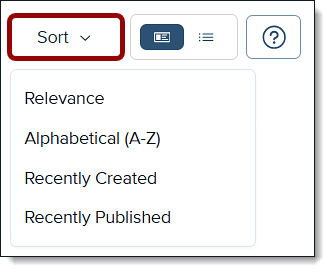
Sort
There are four ways to sort content:

Sorting content can help you locate a specific course to work on the most recent version. If you add filters, the sorting convention you were using remains active.
Note: Remember that "recently created" does not mean recently edited. If you created your course a year ago, no matter whether you edited it five minutes ago, it will show up in chronological order with the other courses created last year.
Three-Dot Menu
The three-dot menu is a great button to check out on every screen in the Amplifire tool because it holds a treasure trove of functionality that is customized by screen.
![]() This particular page has a three-dot menu beside each course tile. From this menu, you can:
This particular page has a three-dot menu beside each course tile. From this menu, you can:
Copy a Course
There are two methods to copy a course: shared and unshared.
![]()
Copy and create new makes a clone of your course that has all the same questions as the original course but the questions are not connected to one another beyond that point. If you edit a question in the copied course, the original is not impacted. This is a great option if you want to keep your original content (the original course) and have a course where you can make changes to create something new.
Copy and share questions, as you might imagine, creates a new course shell that includes questions that are shared with the original course. If you edit a question in this case, the original and the copied question are changed. This is a great option if you have a lot of cross-over between courses and you want to minimize edits.
Add a Course to a Folder
Adding a course to a folder is just as easy as it sounds. Click Add to Folder and select the folder.
For more information on folders, check out the folder section in this article.
Copy and Catalog to Account
The ability to copy or catalog a course to another account is a super-user tool. If you have a need to do that, please contact your CSM for help.
Info
The info panel, also accessible from the Question Page, provides historical information on the course. The created, published, and edited dates and users can help to track changes. Published status, revisions, question count, and course ID also provide valuable information.
![]()